![]()
Updated Dec 29, 2021 Verified Pass MO-300 Exam in First Attempt Guaranteed
Free MO-300 Sample Questions and 100% Cover Real Exam Questions (Updated 35 Questions)
Schedule exam
Languages: English, English (Malaysia), German, Spanish, Indonesian (Indonesia), Korean, Dutch, Italian, Russian, French, Portuguese (Brazil), Polish, Greek (Greece), Chinese (Simplified), Chinese (Traditional), Japanese, Arabic (Saudi Arabia)
Retirement date: none
This exam measures competency to create, edit, and enhance presentations and slideshows, including the ability to create and manage presentations, insert and format shapes and slides, create slide content, apply transitions and animations, and manage multiple presentations. Presentation examples include professional-grade sales presentations, employee training, instructional materials, and kiosk slideshows.
Microsoft is one of the biggest companies that offers loads of certifications that are helping the professionals around the world. One such option is Microsoft Office Specialist: PowerPoint Associate (PowerPoint and PowerPoint 2019). If you want to get this certificate, you will need to pass the Microsoft MO-300 exam. Therefore, it is important to pay more attention to this test and explore its details.
NEW QUESTION 19
On slide 4, add the Swivel animation to the gazebo image.
Answer:
Explanation:
See the steps below.
Explanation
Launch PowerPoint, click "Insert" and then click the "More" arrow beneath the Shapes button.
2Click the rectangle shape from the drop-down menu. Double-click a point on the slide to add the rectangle to the slide.
3Click "Animations" and then click the "More" arrow in the Animations section. A drop-down menu opens and displays a list of animation types. Click the "Spin" animation to apply it to the rectangle. PowerPoint also places a small tag containing a number next to the rectangle. This tag lets you know that the rectangle has an animation.
NEW QUESTION 20
For all slides, set the transition duration to 3 seconds.
Answer:
Explanation:
See the steps below.
Explanation
Set the speed of a transitionSelect the slide that has the transition that you want to change. On the TRANSITIONS tab, in the Timing group, in the Duration box, type the number of seconds that you want it to run. If you want all the slide show's transition effects to use the same speed, click Apply To All.
NEW QUESTION 21
On slide 2, in the content placeholder, insert a Vertical Curved List SmartArt graphic. Label the first shape
''Structures'' and the second shape ''Perennials'', Delete any unused shapes.
Answer:
Explanation:
See the steps below.
* Select the slide where you want the SmartArt graphic to appear.
* From the Insert tab, select the group.
* A dialog box will appear. Select a category on the left, choose the desired SmartArt graphic, then click OK.
* The SmartArt graphic will appear on the current slide.
NEW QUESTION 22
On the ''Who Are'' slide, apply the Bevel Perspective Left, White picture style and the Paint Brush artistic effect to the image.
Answer:
Explanation:
See the Steps below
Explanation
1. Select the picture.
2. Select Picture Tools > Format and select
3. Hover over the options to preview them and select the one you want.
Topic 2, TravelExhibit.
NEW QUESTION 23
On slide 3, use the 3D Models feature to insert the Foundation model from the 3D Objects folder, Resize the model to a height of 4'' (10.16.cm). Place the model to the left of the bulleted list.
The exact position of the model does not matter.
Answer:
Explanation:
See the steps below.
Explanation
Use the 3D control to rotate or tilt your 3D model in any direction. Just click, hold and drag with your mouse.
Drag the image handles in or out to make your image larger or smaller.
NEW QUESTION 24
For all slides, set the transition variation to From Left.
Answer:
Explanation:
See the steps below.
Explanation
Select the slide you want to add a transition to.
* Select the Transitions tab and choose a transition.
Select a transition to see a preview.
* Select Effect Options to choose the direction and nature of the transition.
Note: Not every transition has Effect Options.
* Select Preview to see what the transition looks like.
To remove a transition, select Transitions > None.
NEW QUESTION 25
On slide1, configure the audio clip to fade in for 2 seconds when the user clicks the audio icon.
Configure the settings so the audio clip plays only one time but continues across multiples slides.
Answer:
Explanation:
See the steps below.
Explanation
Click the up arrow next to "Fade In:" in the ribbon's Editing tab to increase the length of the fade. For example, if you want one second to pass between when the music starts playing and when it reaches its full volume, click the arrow repeatedly until the "Fade In:" box reads 01.00.
NEW QUESTION 26
On slide 2, insert Section Zoom links to ''Section 2: Products and Services'', Section 3: Clubs an Teams'', and
''Section 4: Contact US'', Reposition the section thumbnails within the black rectangle so they are not stacked on top of each other.
The exact order and location of the thumbnails do not matter.
Answer:
Explanation:
See the steps below.
* Press and hold Ctrl while you select each object.
* Select Format >Group > Group
* Format or move the grouped object however you want.
NEW QUESTION 27
On slide 3, convert the bulleted list to a Basic Block SmartArt graphic.
Answer:
Explanation:
pending
Send us your feedback answers for this.
NEW QUESTION 28
Set up the slide show to require the viewer to manually advance the slides.
Answer:
Explanation:
See the steps below.
Explanation
Select the slide that you want to set the timing for. To make the to the next slide when you click the mouse, select the On Mouse Click check box. To make the automatically, select the After check box, and then enter the number of minutes or seconds that you want.
NEW QUESTION 29
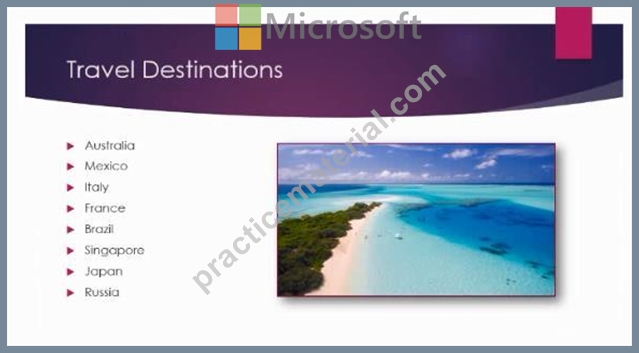
On the ''Travel Destinations'' slide, add the alt text description '' Ocean' to the image.
Answer:
Explanation:
See the Steps below
* Do one of the following: Right-click the object and select Edit . Select the object. Select Format
> Alt Text. ...
* In the Alt Text pane, type 1-2 sentences in the the object and its context to someone who cannot see it.
NEW QUESTION 30
You are creating a presentation about landscape products.
Create a section named ''Structures'' that includes only slides 3 and 4.
Answer:
Explanation:
See the steps below.
* Right-click between slides and select Add Section. An Untitled Section is added in the thumbnail pane, and the Rename Section dialog box opens.
* Type a name in the Section name box.
* Select Rename.
* To collapse a section, click the triangle next to the section name.
NEW QUESTION 31
At the end of the presentation, insert the slides from the Campus presentation in the Documents folder.
After you insert the slides, slide 6 should be ''Discover Your Campus'' and slide 7 should be 'Display Your Art''.
Answer:
Explanation:
See the Steps below
* Click on the Office button.
* At the bottom of the dialog box, click PowerPoint Options.
* In the list of options on the left, select Advanced.
* Scroll down the list of options to find the Slide Show section.
* Select the End with black slide check box.
* Click OK.
NEW QUESTION 32
On slide 2, reverse the stacking order of the screen images so the smartphone is in front, the table in the middle, and the monitor in back.
Answer:
Explanation:
See the steps below.
* Select the object.
* Right-click and select an option: Direction. Select this option. Bring to Front > Bring to Front to move the object to the top layer of the . Bring Forward to move the object up one layer in the stack.
Send to Back > Send to Back to move the object to the bottom layer of the stack.
Topic 5, RecipeExhibit.


NEW QUESTION 33
......
Download Real Microsoft MO-300 Exam Dumps Test Engine Exam Questions: https://testking.practicematerial.com/MO-300-questions-answers.html